20/04/2013
Coniotomie: Avant tout de bons repères
La réalisation d'une coniotomie en conditions extrêmes n'est pas une chose si aisée que cela. Bien souvent l'opérateur peut être obnubilé par le fait de faire pénétrer un tuyau dans un trou alors que ce qui est important c'est le trou au bon endroit et de taille suffisamment large pour admettre le tuyau. Au final ce qui est FONDAMENTAL c'est donc de prendre ses repères et de vérifier le diamêtre de l'ouverture faite.
C'est ce qu'exprime ce document intéressant et très pratique dont l'un des auteurs est un des inventeurs d'une technqiue de trachéotomie percutanée.
_________________________________________
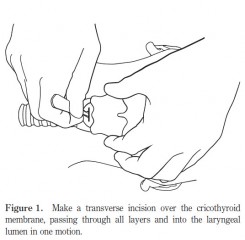
The first step of the ‘scalpel–finger–tube’ method is to stabilize the larynx with the non-dominant hand, identify the cricothyroid membrane visually and by palpation, and to incise horizontally all the way through skin and cricothyroid membrane into the laryngeal lumen in one motion (Fig. 1).
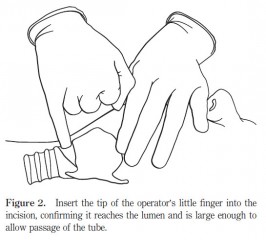
In the emergency situation, neither skin antiseptics nor local anaesthesia are used.Any suitable blade can be used, either on or off the handle. The incision is extended laterally until judgedlarge enough to accommodate the tip of the operator’s gloved little finger, that is, approximately 15 mm. The second step is to remove the scalpel and insert the tip of the operator’s little finger into the incision (Fig. 2), confirming by palpation that the incision has penetratedinto the laryngeal lumen, and that the incision is large enough to accommodate the finger, and therefore, an endotracheal tube.
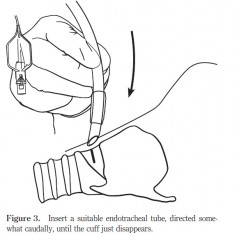
Finally, in the third step, a cuffed oral endotracheal tube is fed through the hole into the trachea, directed somewhat caudally (Fig. 3)
| Tags : airway, coniotomie
Les commentaires sont fermés.